Introspecting app
Screen Scraping
Much like how we identify elements of DOM for a web page using Selenium, we follow a similar process for an app. That is, we need to first uniquely identify the locator for an element, before performing an action on it. There are various strategies for that and to get a refresher, you may read this.
Most of the UI Automation tools and web scrapers have a element identification strategy and knowing it helps you automate actions.
It is a good idea to spend some time introspecting your mobile app's "view" as it gets rendered onto the screen. More importantly, understanding the html representation and various attributes etc. would help write automation scripts faster.
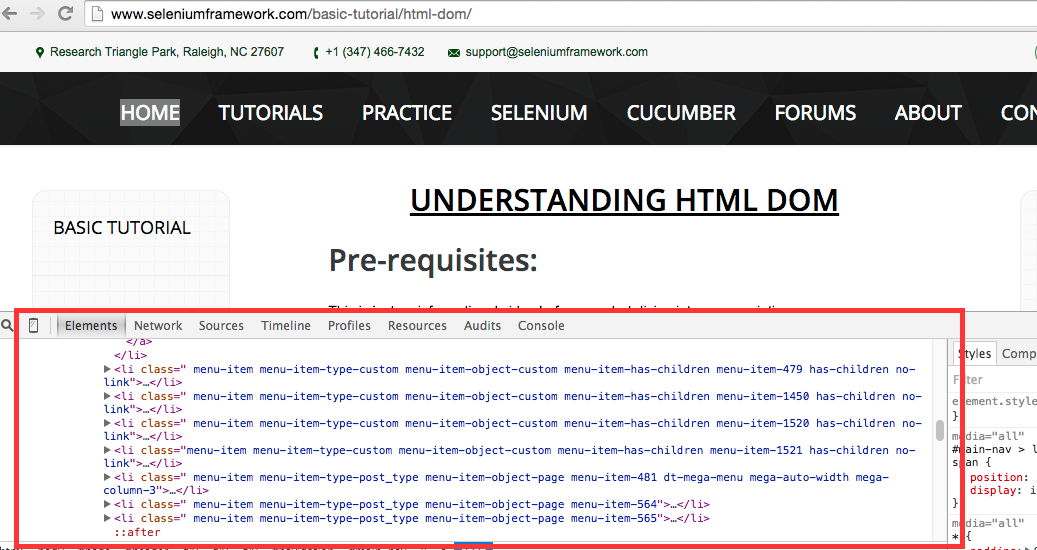
This is very similar to using Chrome's Dev tools (inspect element), Firefox Inspect Element/Firepath/Firebug or IE Developer tools. While writing web application automation scripts using Selenium, it is quintessential that we use Developer tools. Below is an illustration.
Appium Ruby Console
Appium ruby console aka. arc is a handy tool to get started quickly introspecting the screen html. Follow the below steps to start using it.
- Install Ruby: Install Ruby 2.0 or higher. Follow instructions here if you need help. It is a good idea to have RubyMine IDE installed too as we will use it in the subsequent chapters
- Install arc gems
For troubleshooting instructions, follow here# Fresh installation gem uninstall -aIx appium_lib ;\ gem uninstall -aIx appium_console ;\ gem install --no-rdoc --no-ri appium_console bond
If you are upgrading, below is what you should expectAnyones-Mac-mini:~ pmacharl$ pwd /Users/pmacharl Anyones-Mac-mini:~ pmacharl$ mkdir arc_tests Anyones-Mac-mini:~ pmacharl$ cd arc_tests/ Anyones-Mac-mini:arc_tests pmacharl$ arc upgrade gem uninstall -aIx appium_lib; gem uninstall -aIx appium_console; gem install --no-rdoc --no-ri appium_console Upgrade complete. - arc configuration file: Arc looks for appium.txt file, which has key,value pairs as defined by arc. There are certain key,value pairs expected for Android vs. ios. Below is a demonstration, how you can get started quickly
Anyones-Mac-mini:arc_tests pmacharl$ arc version
appium_console: v1.0.4
    appium_lib: v8.0.1
Anyones-Mac-mini:arc_tests pmacharl$ arc setup android
Anyones-Mac-mini:arc_tests pmacharl$ ls
appium.txt
Anyones-Mac-mini:arc_tests pmacharl$ cat appium.txt
[caps]
platformName = "android"
deviceName = "Nexus 7"
app = "./api.apk"
appPackage = "io.appium.android.apis"
appActivity = ".ApiDemos"

[appium_lib]
sauce_username = ""
sauce_access_key = ""
- The sauce_username and sauce_access_key can be safely ignored until you plan to use saucelabs infrastructure for execution
- The values for appPackage and appActivity for Android can either be gotten by talking to the developer of app or discovered using the below commands
Method1
# Returns the package's name, versionCode and so on
aapt dump badging app-debug.apk | grep package:\ name
# Returns all launchable activities. Generally the main entry point to app will be named as *.MainActivity (but that may change as per developer's decision)
aapt dump badging app-debug.apk | grep launchable-activity
Method2
The package name and activity can also be read from the manifest file. You can see full content of manifest file by executing the below command. This will output the topology (meta-data and its hierarchy) of your app. The activity that doesn't have any ParentActivity will be the MainActivity in general. Rest all activities will have ParentActivity (An activity is a single screen with user interface)
aapt l -a app-debug.apk
Note: The appt binary is located in $ANDROID_HOME/build-tools/x.y.z directory
For full list of appium.txt capabilities (key,value pairs above), see this
Note: On Android "deviceName" capability is currently ignored
Instrospecting using arc
Pre-Requisites
Set up an avd and name it "Nexus_4_API_23". The base images are already available with sdk (See previous chapter avd manager in 'Tools to know')
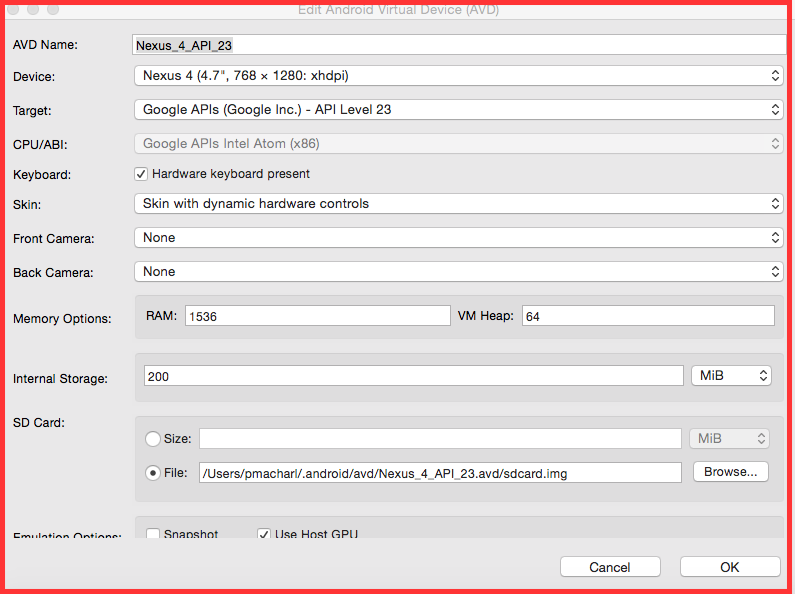
Notice that "Use Host GPU" is selected and "Snapshot" is NOT. The two fields are mutually exclusive for selection
- Appium Server should be running. Start it on default 4723 port
Appium.txt
Using the below appium.txt configuration file, type "arc" in the folder that contains appium.txt
# appium.txt
[caps]
platformName = "Android"
deviceName = "Android"
avd = "Nexus_4_API_23"
app = ""
appPackage = "com.android.settings"
appActivity = ".Settings"

[appium_lib]
sauce_username = ""
sauce_access_key = ""
- As soon you type "arc" in command line, you should see processing and the avd will be launched (Patience is a virtue here because avd's take time to launch based on your machien configuration)
- In the command line, the control returns to arc (pry), where we can now interact with the avd through appium_lib provided api calls
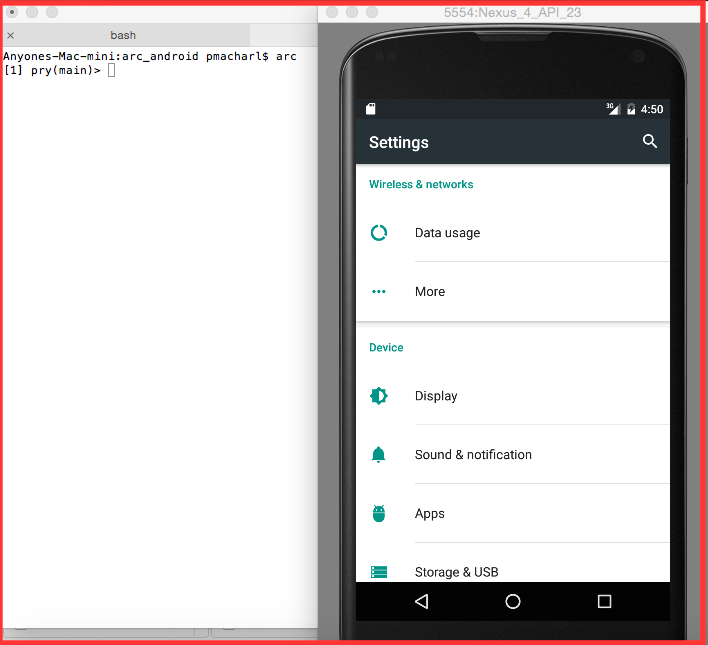
- Full list of available commands is documented here and evolving
page_class
Anyones-Mac-mini:arc_android pmacharl$ arc
[1] pry(main)> page_class
22x android.widget.LinearLayout
10x android.widget.FrameLayout
10x android.widget.TextView
6x android.view.View
6x android.widget.RelativeLayout
6x android.widget.ImageView
4x android.view.ViewGroup
1x android.widget.ScrollView
1x hierarchy
source
[2] pry(main)> source
<?xml version="1.0" encoding="UTF-8"?>
<hierarchy rotation="0">
  <android.widget.FrameLayout index="0" text="" class="android.widget.FrameLayout" package="com.android.settings" content-desc="" checkable="false" checked="false" clickable="false" enabled="true" focusable="false" focused="false" scrollable="false" long-clickable="false" password="false" selected="false" bounds="[0,0][768,1184]" resource-id="" instance="0">
    <android.view.ViewGroup index="0" text="" class="android.view.ViewGroup" package="com.android.settings" content-desc="" checkable="false" checked="false" clickable="false"
[3] pry(main)> id('android:id/decor_content_parent')
#<Selenium::WebDriver::Element:0x323fca632c4ee948 id="1">
[4] pry(main)> id('android:id/decor_content_parent').methods
[
    [  0]                                !()                 Selenium::WebDriver::Element (BasicObject)
    [  1]                               !=(arg1)             Selenium::WebDriver::Element (BasicObject)
[30] pry(main)> xpath('//android.widget.FrameLayout').get_page_class
"15x android.widget.FrameLayout\n11x android.widget.LinearLayout\n8x android.widget.TextView\n6x android.view.View\n6x android.widget.ImageView\n1x android.widget.GridLayout\n1x android.widget.ScrollView\n1x android.view.ViewGroup\n1x android.widget.RelativeLayout\n1x hierarchy"
[31] pry(main)> xpath('//android.widget.FrameLayout').get_android_inspect
"\nandroid.widget.FrameLayout (1)\n  id: com.android.systemui:id/panel_holder\n\nandroid.widget.FrameLayout (2)\n
Finally if you would prefer to use the driver object (selenium driver) directly instead of wrapped methods (like text(), id() etc. that we used above), you can access driver object directly.
driver.textfields
driver.find_element(:xpath, "//android.widget.FrameLayout")
The takeway from this section is that the more practice and comfortable you get with the api's exposed by appium, the easier it would be to code the same during scripting
Introspecting using uiautomatorviewer
In the chapter uiautomatorviewer, we introduced the tool. Now lets see how to use it to introspect an app.
- Type "uiautomatorviewer" in command line and that launches the program ($ANDROID_HOME/platform-tools should be in $PATH)
- Click the icon "Device screenshot, uiautomator dump"
- Select the android target (avd/device) that uiautomatorviewer should take the xml screenshot from
- For avd, it takes a little bit more time than a real device
- After this you can see the tree hierarchy and use the attributes to further identify elements during automation script writing
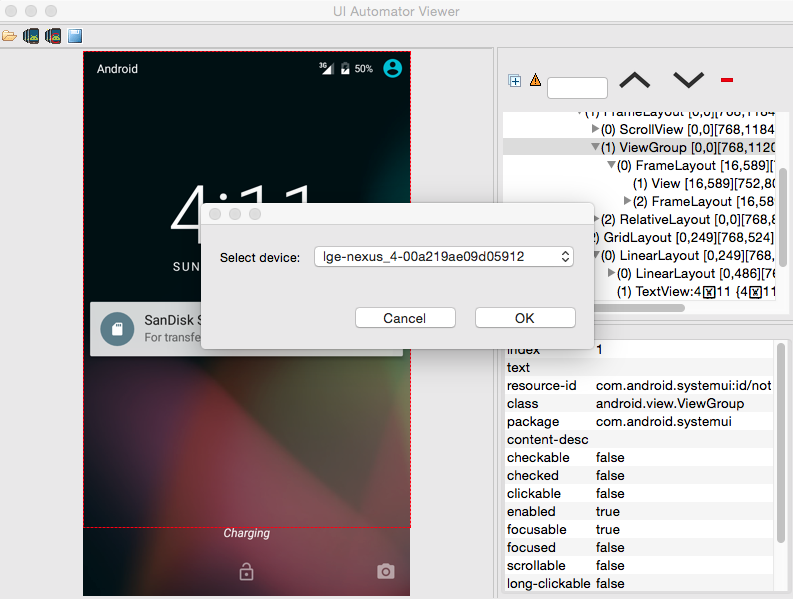
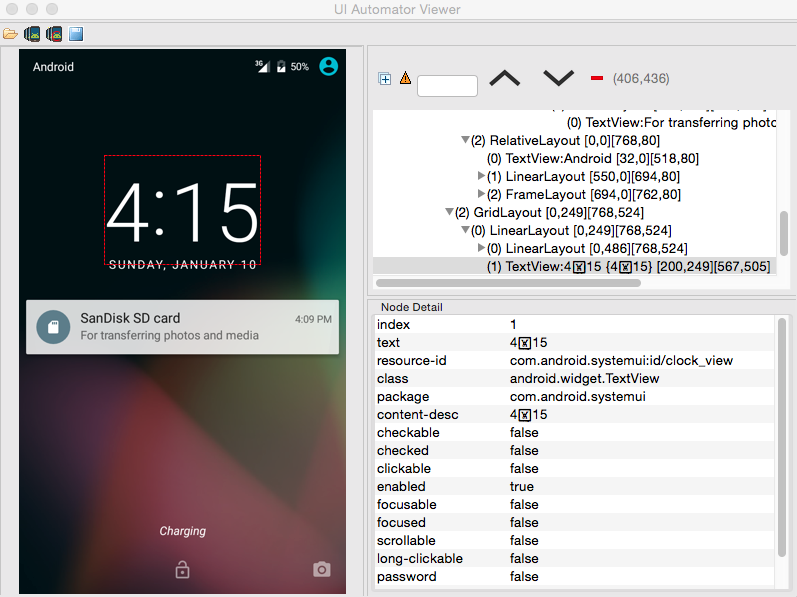
In the above diagram, we can identify the element that displays the time with appium using any of the following locator(s):
id('com.android.systemui:id/clock_view')
tag('android.widget.TextView') # Observe that classname is tag in mobile app.
Introspecting using Chrome
The requisite for this is that the target device/avd should have at Android sdk 4.4+. We already explained the steps on how to do this in a previous chapter.